Change Sound Effect
This guide will tell you how to change the sound effects and voice pack using the Audio Manager tool.
Preparation
-
PCS Controller: You will have this asset after installing PCS onto your avatar. It can be found in the following folder:
Assets/!Dismay Custom/Penetration Contact System/#GENERATE/[avatar name] -
Audio: Each sound must be separated into individual audio files. For example, if a single audio file contain 3 impact hits, you need to split them into 3 separate files — resulting in a total of 3 audio files
(impact1, impact2, impact3)for that specific sound.- For voices, if possible, please trim any silent or empty areas from the waveform. The tool attempts to match the animation speed with the voice duration for smoother playback. If silent sections are left in the clip, each moan will play with a longer delay, as it must wait for the previous audio clip to finish before starting the next one.
-
Format: You may use any audio format supported by Unity, such as
.mp3. However,.wavis recommended, as re-encoding pre-compressed audio may result in quality loss.
Method A: Using Audio Manager Tool
This tool provides a quick and simple way to change the sound effects for your PCS. The changes will apply only to the selected avatar.
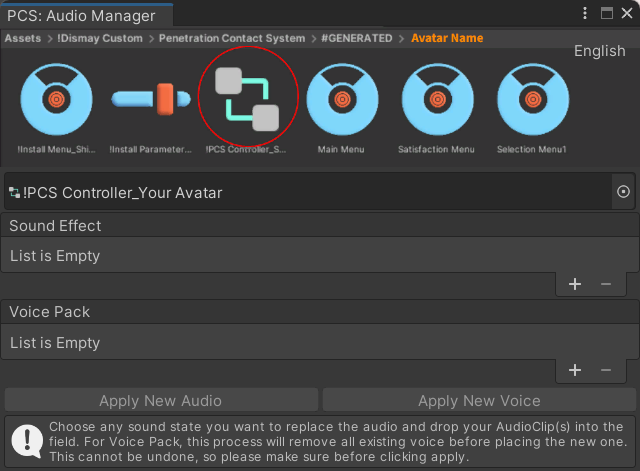
- Open the Audio Manager tool. It is located at:
Dismay Custom/Penetration Contact System/Audio Manager - Drag and drop your
!PCS Controller_[avatar name]into the field to begin replacing audio. - Manage audio slots:
- 3.1 Click
+to add an empty slot, then drag and drop your audio file(s) into the field. - 3.2 Click
-to remove any slot you do not wish to replace.
- 3.1 Click
- Click
Apply New AudiorApply New Voiceto confirm and replace the sounds.
Method B: Manual Replace
Once all sounds have been applied, they will be saved into your !PCS Controller_[avatar name].
You can open it later to manually replace or adjust the audio settings inside each animation state if needed.
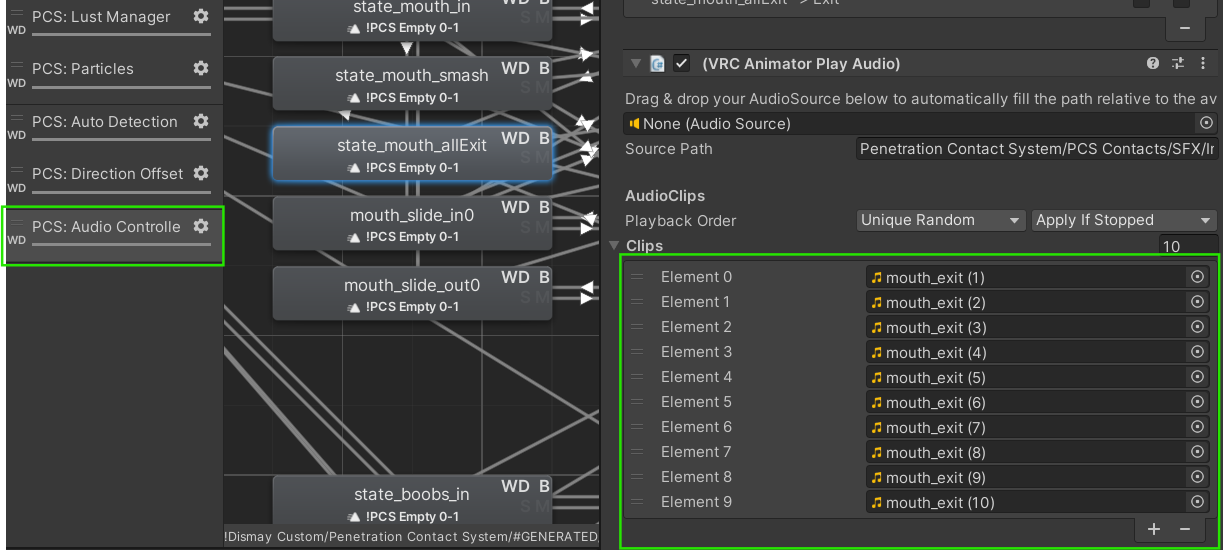
This method may not be the easiest or most convenient, but it allows you to directly replace and adjust additional settings, such as randomizing the pitch of the audio. Below is how to do it.
- Right-click your
!PCS Controller_[avatar name]and selectOpen - Go to the Animator window and select the layer named
PCS: Audio Controllerto locate all sound states. - Select the sound state you want to modify, then drag and drop your audio files into the
VRC Animator Play Audio→Clips.
Explanation of Each Sound Type
| Type | Subtype | Description | Note |
|---|---|---|---|
| Sound Effect | In | Inward movement sound | - |
| Sound Effect | Out | Outward movement sound | - |
| Sound Effect | Smash | Strong impact sound | Soft, medium, Hard for pussy and anal |
| Sound Effect | Exit | Sound played when fully withdrawn | No exit for boobs |
| Sound Effect | Gagging | Choking or muffled sounds | Only for mouth |
| Voice | Soft | Moan from light impact | - |
| Voice | Rough | Moan from heavy impact | - |
| Voice | Relax | Plays when idle for a period | - |
| Voice | Event | Extended moans or phrases | Supports up to 12 event slots. If fewer than 12 audio files are assigned, the remaining slots, will be left empty. Event 12 = orgasm voice. |
| Voice | Combo | Sequential voice playback | There are 3 combo set |
| Oral | Shallow | A muffled “oof” sound when an object is inserted not very deeply. | - |
| Oral | Deep | A muffled “oof” sound when an object is inserted deeply. | - |